精選文章
Arduino Ameba - GPIO DHT 溫溼度計
Ameba 總覽
Adafruit 有出一個 DHT 的 Arduino library :
https://github.com/adafruit/DHT-sensor-library.git
我目前用這套 porting 到 Ameba 平台, 有同時在 Arduino Due 上使用也可以.
(1) Adafruit DHT11 接法 :
http://ming-shian.blogspot.tw/2014/05/arduino19dht11.html
有三根腳. 我拿到的是
在有標示 "-" 的這根接 GND
中間接 VDD - 5V
最右邊的接 訊號線, 目前範例用 D2
(2) DHT22

可能會拿到 3 根的, 3根表示 NC 沒接出來.
在有標示 "+" 的這根接 5V
在有標示 "-" 的這根接 GND
中間接 訊號線, 目前範例用 D2
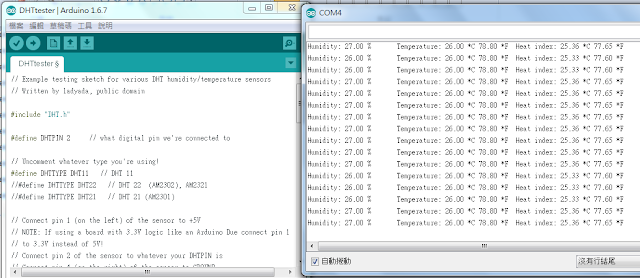
範例程式 : 目前 放在 DHT sensor library 下 , 有個 DHTTester
如果有安裝實驗版, 也可以從範例那邊下拉選擇.
// Example testing sketch for various DHT humidity/temperature sensors
// Written by ladyada, public domain

#include "DHT.h"

#define DHTPIN 2     // what digital pin we're connected to

// Uncomment whatever type you're using!
//#define DHTTYPE DHT11   // DHT 11
#define DHTTYPE DHT22   // DHT 22  (AM2302), AM2321
//#define DHTTYPE DHT21   // DHT 21 (AM2301)

// Connect pin 1 (on the left) of the sensor to +5V
// NOTE: If using a board with 3.3V logic like an Arduino Due connect pin 1
// to 3.3V instead of 5V!
// Connect pin 2 of the sensor to whatever your DHTPIN is
// Connect pin 4 (on the right) of the sensor to GROUND
// Connect a 10K resistor from pin 2 (data) to pin 1 (power) of the sensor

// Initialize DHT sensor.
// Note that older versions of this library took an optional third parameter to
// tweak the timings for faster processors.  This parameter is no longer needed
// as the current DHT reading algorithm adjusts itself to work on faster procs.
DHT dht(DHTPIN, DHTTYPE);

void setup() {
  Serial.begin(9600);
  Serial.println("DHTxx test!");

  dht.begin();
}

void loop() {
  // Wait a few seconds between measurements.
  delay(2000);

  // Reading temperature or humidity takes about 250 milliseconds!
  // Sensor readings may also be up to 2 seconds 'old' (its a very slow sensor)
  float h = dht.readHumidity();
  // Read temperature as Celsius (the default)
  float t = dht.readTemperature();
  // Read temperature as Fahrenheit (isFahrenheit = true)
  float f = dht.readTemperature(true);

  // Check if any reads failed and exit early (to try again).
  if (isnan(h) || isnan(t) || isnan(f)) {
    Serial.println("Failed to read from DHT sensor!");
    return;
  }

  // Compute heat index in Fahrenheit (the default)
  float hif = dht.computeHeatIndex(f, h);
  // Compute heat index in Celsius (isFahreheit = false)
  float hic = dht.computeHeatIndex(t, h, false);

  Serial.print("Humidity: ");
  Serial.print(h);
  Serial.print(" %\t");
  Serial.print("Temperature: ");
  Serial.print(t);
  Serial.print(" *C ");
  Serial.print(f);
  Serial.print(" *F\t");
  Serial.print("Heat index: ");
  Serial.print(hic);
  Serial.print(" *C ");
  Serial.print(hif);
  Serial.println(" *F");
}
記得程式 define 那邊要改成用 DHT11
// Uncomment whatever type you're using!
#define DHTTYPE DHT11   // DHT 11
//#define DHTTYPE DHT22   // DHT 22  (AM2302), AM2321
//#define DHTTYPE DHT21   // DHT 21 (AM2301)
DHT 22 實驗結果
Humidity: 51.50 % Temperature: 28.20 *C 82.76 *F Heat index: 28.82 *C 83.88 *F
Humidity: 53.40 % Temperature: 28.30 *C 82.94 *F Heat index: 29.14 *C 84.46 *F
Humidity: 53.10 % Temperature: 28.40 *C 83.12 *F Heat index: 29.24 *C 84.63 *F
----
Library 程式解說:
可以參考這份 datasheet
Reset :
每一次傳輸時間約兩秒, 所以兩秒內重複下無效.
1. 一開始 GPIO output 起始訊號,
(1) 先拉 HIGH , 250 ms
(2) 拉 LOW 20 ms ( datasheet 要求至少 1ms)
(3) 再拉 HIGH 40 us ( datasheet : 20~40 us)
2. GPIO 改為 input 接收 感測器資料
如果 感測器 接受, 會先 pull low 80 us , 再 pull high 80 us
3. 開始傳送 data
先拉 50 us LOW, 再 拉 HIGH,
(1) 如果拉 HIGH 時間是 26~28 us 代表 0
(2) 如果拉 HIGH 時間是 70 us 代表 1
所以程式是用 拉 LOW 的 count數 , 和 拉 HIGH 的 count 數來做比較.
HIGH count < LOW count : 0 , HIGH count > LOW count : 1
HIGH count < LOW count : 0 , HIGH count > LOW count : 1
因為這對 timing 要求很高, 所以我們用 __disable_irq() 來禁制其他 interrupt 干擾
很神奇吧. 一根訊號線不用 clock, 也可以傳資料.
留言


from D:\arduino-1.6.6\build\sketch\DHTtester.ino.cpp:1:
回覆刪除C:\Users\user\Documents\Ameba\libraries\DHT/DHT.h: In constructor 'InterruptLock::InterruptLock()':
C:\Users\user\AppData\Local\Arduino15\packages\realtek\hardware\ameba\1.0.2\cores\arduino/wiring_constants.h:83:38: error: '__disable_irq' was not declared in this scope
#define noInterrupts() __disable_irq()
^
C:\Users\user\Documents\Ameba\libraries\DHT/DHT.h:67:5: note: in expansion of macro 'noInterrupts'
noInterrupts();
^
C:\Users\user\Documents\Ameba\libraries\DHT/DHT.h: In destructor 'InterruptLock::~InterruptLock()':
C:\Users\user\AppData\Local\Arduino15\packages\realtek\hardware\ameba\1.0.2\cores\arduino/wiring_constants.h:82:35: error: '__enable_irq' was not declared in this scope
#define interrupts() __enable_irq()
^
C:\Users\user\Documents\Ameba\libraries\DHT/DHT.h:70:5: note: in expansion of macro 'interrupts'
interrupts();
^
Using library DHT at version 1.2.3 in folder: C:\Users\user\Documents\Ameba\libraries\DHT
exit status 1
Error compiling.
You can use this SDK.
回覆刪除http://njiot.blogspot.tw/2015/12/arduino-windows-installation-by-using.html
and set link in preference.txt
https://github.com/neojou/arduino-ameba/raw/master/release/package_njiot.com_ameba_index.json